Azure - 實作Azure上的AD與MVC進行驗證 - Azure設定篇 ( 一 )
隔離上次寫文章,竟然整整的拖超過一個月( 連Windows Azure都改名為Microsoft Azure了…)…實在是因為這段時間整個忙到翻掉,上班趕Code…下班查資料…最慘的是,下周起還要進行待在公司的瘋狂加班…來進行衝刺… ( 這大概是我們公司成立以來,第一次破例這樣子了…還好公司方面也覺得Developer很辛苦,所以不會用補修打發我們,而是使用加班費的方式~… ) 但不管怎樣… 還是不想加班阿QQ…
好吧,前面發了一些牢騷後,我們就再偉大的母親節這天,來繼續看一下Microsoft Azure上AD與MVC如何進行整合。
另外,因為整個過程很長,所以會分成好幾篇文章來撰寫…
首先,我們先進入Azure管理介面,然後選擇要使用的AD。
接下來,選擇應用程式,並且選擇加入。
因為我們是要讓自己寫的應用程式可以通過AD驗證,所以要選擇"加入我的組織正在開發的應用程式",如果要使用第三方應用程式來搭配Azure AD,那就要選擇"從組件庫中新增應用程式"。
接下來,我們要給一下名稱;因為我們是要開發Web應用程式,所以自然就是選擇"Web應用程式和/或WEB API"
接下來,要填一下登入的URL和應用程式識別碼URI,基本上就是你應用程式的網址,而URI則是網址格式的一段字串,通常都是[https://[AD名稱](https://[AD)]/[應用程式名稱]。
完成之後,還有很多工作要設定,首先,第一個要注意到的是用戶識別碼,這個地方;這個其實也等同於ID,下一篇會用到,所以要特別留意一下。接下來,金鑰的地方,記得去選擇一年或是兩年,並且儲存之後,就會出現金鑰,這個也會在第二篇的時候用到,這也就是所謂的Key ( PW )。
接下來,最底下,要設定應用程式權限為Read Directory Data,這樣我們才讀的到資料。
到這邊為止,就算是Azure設定完成了。
完成之後,我們就要開始進行MVC的開發…這邊我們要玩就玩大一點,所以就選擇全空的專案…
之後,我們要用NuGet進行安裝,基本上,要安裝的有這些套件
- System.IdentityModel.Tokens.ValidatingIssuerNameRegistry
- Microsoft.IdentityModel.Clients.ActiveDirectory
- Microsoft.AspNet.Identity.EntityFramework
首先我們要安裝Token的套件,也就是System.IdentityModel.Tokens.ValidatingIssuerNameRegistry。
接下來,要安裝的是Microsoft.IdentityModel.Clients.ActiveDirectory。
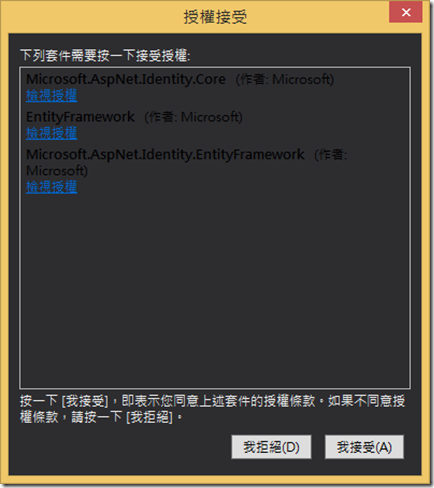
另外,畢竟是驗證,所以我們要使用Identity套件,而我們這邊使用Identity搭配Entity Framework;這邊或許有人會覺得疑惑,為什麼Azure AD的驗證還要搭配Entity Framework !?..其實不用也是可以啦,在官方現在標準的作法,會使用Entity Framework來將驗證方的相關資訊存放到DB裡面去,而不是早期的Web.config…會這樣做的原因,官方是說,它們實現了一個機制,可以利用Lib去產生驗證方的資訊;而會有這種做法,主要是因為官方覺得,早期寫到web.config的時候,是寫死的,所以當驗證方的資訊改變的時候,變成一定要手動再去調整web.config,而中間的這段時間,就有可能讓程式停擺…所以現在官方是希望透過程式自動產生資訊,並且存放到DB;而這次的文章,主要還是會透過DB,小弟我看了一下機制後,感覺還不錯,所以就繼續沿用這個機制來實作,但原則上因該也是可以透過web.config,但這塊可能就請看官大大們,自己嘗試一下嚕~~
所以這邊會把Entity Framework通通加進去~
裝完之後,我們可以先看一下Web.config,並且刪除掉一些不用的東西,原始是這樣。
<?xml version="1.0" encoding="utf-8"?>
<!--
  如需如何設定 ASP.NET 應用程式的詳細資訊,請瀏覽
  http://go.microsoft.com/fwlink/?LinkId=301880
  -->
<configuration>
  <configSections>
    <!-- For more information on Entity Framework configuration, visit http://go.microsoft.com/fwlink/?LinkID=237468 -->
    <section name="entityFramework" type="System.Data.Entity.Internal.ConfigFile.EntityFrameworkSection, EntityFramework, Version=6.0.0.0, Culture=neutral, PublicKeyToken=b77a5c561934e089" requirePermission="false" />
  </configSections>
  <appSettings>
    <add key="webpages:Version" value="3.0.0.0" />
    <add key="webpages:Enabled" value="false" />
    <add key="ClientValidationEnabled" value="true" />
    <add key="UnobtrusiveJavaScriptEnabled" value="true" />
  </appSettings>
  <system.web>
    <compilation debug="true" targetFramework="4.5" />
    <httpRuntime targetFramework="4.5" />
  </system.web>
  <entityFramework>
    <defaultConnectionFactory type="System.Data.Entity.Infrastructure.LocalDbConnectionFactory, EntityFramework">
      <parameters>
        <parameter value="v12.0" />
      </parameters>
    </defaultConnectionFactory>
    <providers>
      <provider invariantName="System.Data.SqlClient" type="System.Data.Entity.SqlServer.SqlProviderServices, EntityFramework.SqlServer" />
    </providers>
  </entityFramework>
</configuration>
最終結果會被我砍成這樣。
<?xml version="1.0" encoding="utf-8"?>
<!--
  如需如何設定 ASP.NET 應用程式的詳細資訊,請瀏覽
  http://go.microsoft.com/fwlink/?LinkId=301880
  -->
<configuration>
  <configSections>
    </configSections>
  <appSettings>
    <add key="webpages:Version" value="3.0.0.0" />
    <add key="webpages:Enabled" value="false" />
    <add key="ClientValidationEnabled" value="true" />
    <add key="UnobtrusiveJavaScriptEnabled" value="true" />
  </appSettings>
  <system.web>
    <compilation debug="true" targetFramework="4.5" />
    <httpRuntime targetFramework="4.5" />
  </system.web>

</configuration>
我們主要是刪除了,configSections裡面的section name = “entityFramework”這個區段。
<configSections>
<!-- For more information on Entity Framework configuration, visit http://go.microsoft.com/fwlink/?LinkID=237468 -->
<section name="entityFramework" type="System.Data.Entity.Internal.ConfigFile.EntityFrameworkSection, EntityFramework, Version=6.0.0.0, Culture=neutral, PublicKeyToken=b77a5c561934e089" requirePermission="false" />
</configSections>
和最下面的entityFramework區段…
  <entityFramework>
    <defaultConnectionFactory type="System.Data.Entity.Infrastructure.LocalDbConnectionFactory, EntityFramework">
      <parameters>
        <parameter value="v12.0" />
      </parameters>
    </defaultConnectionFactory>
    <providers>
      <provider invariantName="System.Data.SqlClient" type="System.Data.Entity.SqlServer.SqlProviderServices, EntityFramework.SqlServer" />
    </providers>
  </entityFramework>
這兩個區段主要是用於,當沒有給連線字串的時候,EF會自動的透過LocalDbConnectionFactory來取得localdb,但因為我們會使用connectionString,所以這個兩個設定就顯得多餘了…
接下來,我們還要參考兩個DLL,但這個不用從Nuget下載;分別是System.IdentityModel和System.IdentityModel.Services。
基本上,初步的設定就到這邊,下一篇,就會針對Azure AD要使用的Web.config進行撰寫。
參考資料
- http://msdn.microsoft.com/zh-tw/library/azure/dn151790.aspx
- http://blogs.msdn.com/b/mvpawardprogram/archive/2014/01/20/identity-in-your-own-apps-with-windows-azure-active-directory.aspx
- http://blogs.msdn.com/b/mvpawardprogram/archive/2014/02/03/identity-in-your-own-apps-with-windows-azure-active-directory-part-2.aspx
- http://www.codeproject.com/Articles/749588/Role-Based-Access-Control-with-Azure-Active-Direct
- http://www.cloudidentity.com/blog/2013/02/08/multitenant-sts-and-token-validation-4/
- http://www.cloudidentity.com/blog/2013/04/02/auto-update-of-the-signing-keys-via-metadata/


