Windows Azure 儲存體–Table
2012/11/06 更新 - 感謝Wifi哥的指教,修正了程式碼的錯誤,由原本的DataKeyNames="PartitionKey"改成DataKeyNames="PartitionKey,RowKey"。
說到Table,大家就會直接聯想到DB的Table,而Windows Azure的其中一個儲存體也叫Table,雖然也叫Table,但和DB的Table不太同,Windows Azure的Table沒辦法像DB一樣,可以設定多個Table的關聯,當然也沒辦法自己去設定PK、FK等等這類似的東西,如果你真的要將資料庫搬移到Windows Azure,那你應該選擇的是SQL Azure ( SQL Server的雲端版本 ),而不是將原本的資料庫內容搬到Windows Azure喔!,這點要注意一下喔!接下來,我們開始介紹Table。
Table架構
如下圖,其實Azure的儲存體,都是由Account ( 帳號 ) 開始,而一個Account可以有多個Table,每個Table又會包含許多的Entity ( 實體 ),每個Entity會有許多的Properties( 屬性 ),其中每個Entity一定會有PartitionKey、RowKey、Timestamp這三個屬性。
這裡,我們針對剛剛上面看到的一堆名詞,做個解釋。
- Storage Account - 所有的Table都是透過此帳號進行存取,他也是整個架構的起點,一個帳號可以有非常多的Table。
- Table - 其實也是一個實體,它包含在Account裡面,而且一個Account可以建立很多個Table。
- Entity ( Row ) - 實體,也很類似於Row ( 行 ),他是存於Table裡面的一個基本的資料類型,一個實體會有一組Properties ( 屬性 ),其中的"PartitionKey"和"RowKey"會組成唯一鍵。
- Property (Column) - 屬性,也很類似於Column ( 欄位 ),他代表著一個實體裡面的其中一個值,而且他支援豐富的型別,另外要注意的是,他有區分大小寫。
- PartitionKey - 每個實體都會有這個屬性,而這個屬性擁有類似分類的功能,例如,我們可能會把PartitionKey設為Car、機車,來分類。
- RowKey - 每個實體都會有這個屬性,我們會利用這個屬性來區別PartitonKey分出來類別裡面唯一的實體。
- Timestamp - 時間戳記,由系統紀錄此Entity何時被修改過。
其中PartitionKey和RowKey比較難讓人懂,其實PratitionKey就等於紀錄這個Entity是屬於哪一個類別,如下圖,假設有許多文章,我們就可以設定好幾筆的資料Partition Key為Examples Doc來進行分類 ( Partition 1 ),另外,又可以設定為FAQ Doc類 ( Partition ),而同一個類(同一個Partition Key)會有許多的Entity,於是就用RowKey來代表唯一的Entity;所以當Partition Key加上Row Key,就可組合成獨一無二的Key,讓我們在茫茫的大Table找到我們想要的,此外,Partition Key也涉及了搜尋效能,所以分類的時候,要想清楚。
此外,關於每個屬性的型態,可以參考此表。
| Property Type | Details |
| Binary | An array of bytes up to 64 KB in size. |
| Bool | A Boolean value. |
| DateTime | A 64-bit value expressed as UTC time. The supported range of values is 1/1/1601 to 12/31/9999. |
| Double | A 64-bit floating point value. |
| GUID | A 128-bit globally unique identifier. |
| Int | A 32-bit integer. |
| Int64 | A 64-bit integer. |
| String | A UTF-16-encoded value. String values may be up to 64 KB in size. |
最後,因為是雲端儲存體,所以如果我們要取得Table,可想而知,就一定是使用Url來當作識別的位置啦!如下。
http://<account>.table.core.windows.net/<table>/
來寫程式吧!!
接下來,我們就來撰寫程式看看吧,我相信大家應該也沒有那麼多的錢可以租用Windows Azure服務,老實說,小弟我也沒那麼多錢,所以我的範例都是在本機上面做測試。
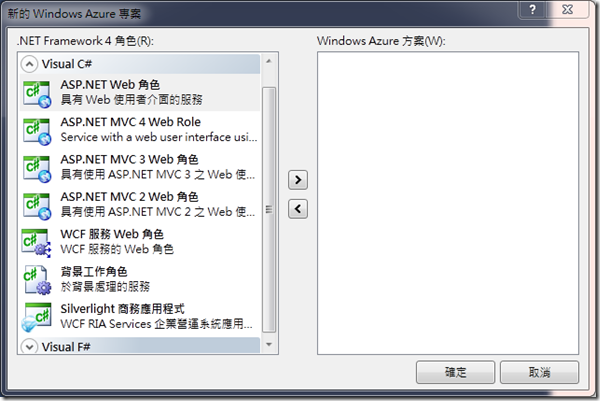
首先,要寫Windows Azure,必須先裝SDK,如果還沒裝的可以參考這篇。接下來就在Visual Studio裡面選擇Windows Azure專案。
到這邊,就可以選擇Web Role,但小弟我不喜歡在這邊選擇,會利用後續再增加的做法,有興趣的可以參考這篇,如果只想要簡單Demo,也可以直接在這邊選擇ASP.NET Web Role ( 中文翻角色 )。
接下來,我們先來看看最後寫完的範例程式執行起來的樣子吧;基本上就是長這樣,只要在姓名與住址的地方填入資料,新增後就會在Grid裡面增加,如果要刪除,就可以自行刪除檔案。
這次的這個範例,裡面會有許多的檔案,所以我先把檔案列出來;主要會撰寫到的有:
- Customer.cs - 此為Cusomter類別,裡面會放置姓名和地址屬性。
- TableContext.cs - 此定義為Customers這個Table。
- DataSource - 存取資料用的。
- Default.aspx - 主要的Web Role。
既然是物件導向,那我們就寫核心的Customer吧;Customer算是滿簡單的,但要注意一下,Customer必須要繼承TableServiceEntity,別忘了,Azure Table的Entity有一些必定要有的屬性( 例如:PartitionKey ),所以並不是所有東西都可以往上丟,我們必須先繼承TableServiceEntity;然後我們於建構式中將PartitionKey傳入Customers,而RowKey的部分,則利用Guid.NewGiud()來產生唯一碼。
using System;
using System.Collections.Generic;
using System.Linq;
using System.Web;
using Microsoft.WindowsAzure.StorageClient;

namespace WebApplicationRole
{
    //需要繼承TableServiceEntity
    public class Customer : TableServiceEntity
    {
        public Customer(string partitionKey, string rowKey):base(partitionKey,rowKey)
        {
        }

        public Customer()
            : this("Customers", Guid.NewGuid().ToString())
        {
        }

        public string name { get; set; }
        public string Address { get; set; }

    }
}
這樣子就完成了Customer,接下我們來設計TableContext,TableContext必須繼承於TableServiceContext,理由和TableServiceEntity一樣,而建構式的部分,則必須傳入bassAddress,和驗證,如果我們取得了Account,我們就可以利用Account的TableEndpoint方法來取得bassAddress,同樣的,也可以利用Account的Credentials來取得驗證;其次,我們定義了Customers的這個屬性,並且利用get來取得所有的Customer,需要注意的是,這裡會使用TableServiceContext的CreateQuery方法來傳回所有的Customer。
using System;
using System.Collections.Generic;
using System.Linq;
using System.Web;
using Microsoft.WindowsAzure.StorageClient;
using Microsoft.WindowsAzure;

namespace WebApplicationRole
{
    public class TableContext : TableServiceContext
    {
        public TableContext(string baseAddress,StorageCredentials credentials):base(baseAddress,credentials)
        {
        }

        //定義Table名稱
        public const string TableName = "Customers";

        //取得Customers這個Table的所有資料
        public IQueryable<customer> Customers
        {
            get
            {
                //需要加入System.Data.Services.Client。
                //利用CreateQuery來取得Customers裡面所有的Customer
                return this.CreateQuery<customer>(TableName);
            }
        }
    }
}
完成了TableContext,我們就可以開始撰寫DataSouce.cs了,顧名思義,就是撰寫取得資料來源的類別;這個類別會定義查詢、新增和刪除;我們會利用建構子去建構連線,並且取得Account和TableContext( 可以想像成Table ),後續我們才能繼續處理;select的地方比較容易理解,利用Linq的方式來取得Customer;而Delete則有個地方要注意,我們會用AttachTo來追蹤支援,這樣才會知道要刪除的位置,刪除後再利用SaveChanges去將資料寫回雲端儲存體;而insert的部分,比較簡單,利用AddObject將Customer加到TableContext裡面,一樣使用SaveChanges來進行變更;而AddObject和AttachTo,必須給他們實體的名稱,也就是第一個參數,而這裡的名稱就是Customers。
using System;
using System.Collections.Generic;
using System.Linq;
using System.Web;
//要手動加這三行
using Microsoft.WindowsAzure;
using Microsoft.WindowsAzure.StorageClient;
using Microsoft.WindowsAzure.ServiceRuntime;

namespace WebApplicationRole
{
    public class DataSource
    {
        private TableContext _ServiceContext = null;

        public DataSource()
        {
            //取得Account
            var storageAccount = CloudStorageAccount.DevelopmentStorageAccount;
            //取得TableContext
            _ServiceContext = new TableContext(storageAccount.TableEndpoint.ToString(), storageAccount.Credentials);
            //假如沒有此Table,則建立此Table
            storageAccount.CreateCloudTableClient().CreateTableIfNotExist(TableContext.TableName);
        }

        public IEnumerable<customer> Select()
        {
            var results = from c in _ServiceContext.Customers
                          select c;
            return results;
        }

        public void Delete(Customer itemToDelete)
        {
            //追蹤資源,這樣才知道位置在哪裡。
            _ServiceContext.AttachTo(TableContext.TableName, itemToDelete, "*");
            _ServiceContext.DeleteObject(itemToDelete);
            _ServiceContext.SaveChanges();
        }

        public void Insert(Customer newItem)
        {
            _ServiceContext.AddObject(TableContext.TableName, newItem);
            _ServiceContext.SaveChanges();
        }
    }
}
最後,我們就可以編輯HTML了,我們利用ASP.NET的ObjectDataSource來指向剛剛設定好的DataSource,並且讓Grid Bind再一起。
<%@ Page Language="C#" AutoEventWireup="true" CodeBehind="Default.aspx.cs" Inherits="WebApplicationRole._Default" %>
<!DOCTYPE html PUBLIC "-//W3C//DTD XHTML 1.0 Transitional//EN" "http://www.w3.org/TR/xhtml1/DTD/xhtml1-transitional.dtd">
<html xmlns="http://www.w3.org/1999/xhtml" >
<head id="Head1" runat="server">
    <title>Table Demo</title>
</head>
<body>
    <form id="form1" runat="server">
    <div>
        <asp:GridView id="DataView" DataSourceId="TableData" DataKeyNames="PartitionKey,RowKey"
        AllowPaging="False" AutoGenerateColumns="True" Runat="server" >
        <Columns>
            <asp:CommandField ShowDeleteButton="true"  />
        </Columns>
    </asp:GridView>
        <br />
    <asp:FormView id="frmAdd" DataSourceId="TableData" DefaultMode="Insert" Runat="server" Width="403px">
        <InsertItemTemplate>
            <asp:Label id="nameLabel" Text="姓名:" AssociatedControlID="nameBox" Runat="server" />
            <asp:TextBox id="nameBox" Text='<%# Bind("Name") %>' Runat="server" />
            <asp:Label id="addressLabel" Text="住址:" AssociatedControlID="addressBox" Runat="server" />
            <asp:TextBox id="addressBox" Text='<%# Bind("Address") %>' Runat="server" />
            <asp:Button id="insertButton" Text="新增" CommandName="Insert" Runat="server"/>
        </InsertItemTemplate>
    </asp:FormView>
    <%-- Data Sources --%>
    <asp:ObjectDataSource runat="server" ID="TableData"  TypeName="WebApplicationRole.DataSource"
        DataObjectTypeName="WebApplicationRole.Customer"
        SelectMethod="Select" DeleteMethod="Delete" InsertMethod="Insert">
    </asp:ObjectDataSource>

    </div>
    </form>
</body>
</html>
最後是Default.aspx.cs的程式碼,這就沒甚麼好講的了。
using System;
using System.Collections.Generic;
using System.Linq;
using System.Web;
using System.Web.UI;
using System.Web.UI.WebControls;

namespace WebApplicationRole
{
    public partial class _Default : System.Web.UI.Page
    {
        protected void Page_Load(object sender, EventArgs e)
        {
            DataSource dataSource = new DataSource();
        }
    }
}
我們這又就完成了程式,如果有寫過Entity Framework等的人,可能會覺得比較熟悉,但如果沒寫過Entity Framework的人,可能有許多地方搞不太清楚,有興趣的話,也可以去翻一翻關於Entity Framework的書籍,或是Linq的書籍,我相信會有很大的幫助。


![image_thumb5[1] image_thumb5[1]](http://lh4.ggpht.com/-7EZJSdboUvI/Tq-uWzTVHfI/AAAAAAAAA38/dHK2ZAQJMbU/image_thumb51_thumb.png?imgmax=800)


