Windows Azure 儲存體–Blob
在Desktop的環境裡面有硬碟可以用來儲存照片、影片、MP3等等,那Windows Azure當然也要儲存體來進行儲存啦,所以這次介紹的是Windows Azure專門用來存取大型資料的儲存體Blob(Binary Large Object),而在談論之前,也有一個觀念要給大家,無論是Blob或是Table、Queue,其實都是存在於資料庫裏面,所以本機要模擬的時候,也必須要有資料庫才能進行測試喔!
Blob架構
既然Blob是儲存在雲端上,就必須符合雲端的特性,所以架構必定和本機上有所不同,以下是Blob的結構圖,我們可以看到,基本上會分成三層,Account(帳號)、Container(容器)、Blob;畢竟網路那麼多使用者,所以一定是用Account來做區分,而一個Account會有非常多的Container,這些Container是可以自己去自訂的,Container的目的其實就像是利用群組的方式,來設定存取的權限,而Container裡面會有許多Blob,基本上就如下圖。( 其實Container也是物件,官方網站也稱Container為Blob Container ),此外,除了下圖外,Container和Blob還擁有Metadata可以進行描述。
Storage Account
- 所有的Blob是透過此帳號進行存取。
- 他是整個架構的起點。
- 一個帳號可以有非常多的Container。
Blog Container
- 此Container必須在Account內,且此Container幫Blob分了群組。
- 共享權限的等級,是設在Container裡面,目前支援Public Read和Private,當此權限為Public Read時,任何人都可以進行讀取,而不需要驗證,只有驗證過的對應使用者能進行存取。
- 容器也有Metadata,大小為8k,是一組<name,value>的形式。
- Blob Containet擁有可以列出所有Blob的方法,所以可以很輕鬆地去做存取。
Blob
- Blob儲存在Container裡面,而且每個Blob最高可儲存50G!
- 每個在Container裡面的Blob都有一個獨一無二的字串名稱。
- Blob也擁有Metadata可以設定,一樣是8k,也是一組<name,value>的形式。
最後,如上圖,因為是雲端儲存體,所以如果我們要取得Blob,可想而知,就一定是使用url來當作識別的位置啦!如下。
http://<account>.blob.core.windows.net/<container>/<blobname>;
來寫程式吧!
接下來,我們就來撰寫程式看看吧,我相信大家應該也沒有那麼多的錢可以租用Windows Azure服務,老實說,小弟我也沒那麼多錢,所以我的範例都是在本機上面做測試。
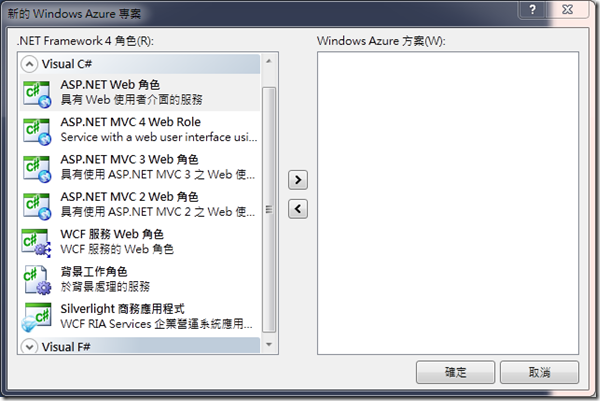
首先,要寫Windows Azure,必須先裝SDK,如果還沒裝的可以參考這篇。接下來就在Visual Studio裡面選擇Windows Azure專案。
到這邊,就可以選擇Web Role,但小弟我不喜歡在這邊選擇,會利用後續再增加的做法,有興趣的可以參考這篇,如果只想要簡單Demo,也可以直接在這邊選擇ASP.NET Web Role ( 中文翻角色 )。
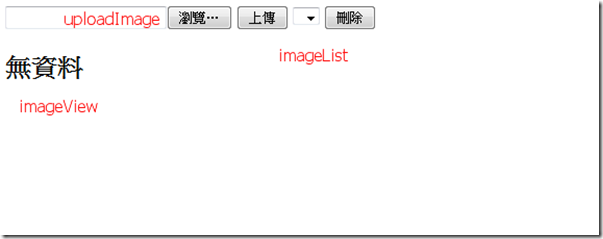
接下來,我們先來看看最後寫完的範例程式執行起來的樣子吧;基本上就是長這樣,這隻程式的主要功能是可以上傳照片,並且可以刪除照片,如果有照片的話,可以從DropDownList可以看到檔名,並且於無資料那邊那個區塊,顯示所有雲端上的照片,這個範例也是Ruddy老師所說的,最經典且簡單的Blob範例,所以小弟我也造樣畫葫蘆,寫了此程式,並用此程式和大家解說。
首先我們先來看看HTML這邊的程式碼,基本就是很基本的ASP.NET。
<%@ Page Language="C#" AutoEventWireup="true" CodeBehind="BlobTest.aspx.cs" Inherits="WebRole1.BlobTest" %>

<!DOCTYPE html PUBLIC "-//W3C//DTD XHTML 1.0 Transitional//EN" "http://www.w3.org/TR/xhtml1/DTD/xhtml1-transitional.dtd">

<html xmlns="http://www.w3.org/1999/xhtml">
<head id="Head1" runat="server">
    <title></title>
</head>
<body>
    <form id="form1" runat="server">
    <div>

        <asp:FileUpload ID="uploadImage" runat=server />
        <asp:Button ID="uploadBtn" runat="server" Text="上傳" onclick="uploadBtn_Click" />

        <asp:DropDownList ID="imageList" runat="server" AutoPostBack="true"></asp:DropDownList>
        <asp:Button ID="delBtn" runat="server" Text="刪除" onclick="delBtn_Click" />

        <asp:ListView ID="imageView" runat="server">
            <LayoutTemplate>
                <asp:PlaceHolder ID="itemPlaceHolder" runat="server" />
            </LayoutTemplate>
            <EmptyDataTemplate>
                <h2>無資料</h2>
            </EmptyDataTemplate>
            <ItemTemplate>
                <!--
                Eval:Eval是用於單向資料繫結,資料是唯讀的顯示。
                Bind:Bind則是雙向的資料繫當,不但能讀取資料,
                更具有Insert、Update、Delete功能,所以若您需要編輯更新、新增與刪除功能使用本方法。
                語法如下。
                -->
                <img src="<%# Eval("Uri") %>" alt="<%# Eval("Uri") %>" style="float:left" />
            </ItemTemplate>
        </asp:ListView>
    </div>
    </form>
</body>
</html>
為了大家方便,我也做了一張對應圖給大家看。
接下來,我們開始撰寫這個BlobTest.aspx.cs吧( 此ASP.NET的程式名稱為BlobTest.aspx ),首先,既然要存取雲端的Blob,我們當然要先準備一下,存取的方法;首先,我們定義一個GetContainer的方法,來取得CloudBlobContainer,這樣後續就可以利用此方法來取得Container底下的Blob了;就如前面說的,任何的Container都是在Account之下,所以我們第一步,就是先取得Account,因為我們是在本機上模擬與測試,所以我們可以使用CloudStorageAccount這個靜態類別的DevelopmentStorageAccount這個靜態方法來取得開發用的Account;有了Account,就可以利用Account來取得Client來進行後續的處理,最後,我們就可以利用Client來取得Container ( 這個Container的名稱就是myContainer );到這邊還滿容易理解的,但是有人可能會有疑問,明明沒看到建立mycontainer這個Container的程式碼阿?沒錯,如果第一次執行的時候,到這邊的確還沒有在資料庫裡建立起mycontainer這個Container,我們只是利用client的GetContainerReference(“mycontainer”)這個方法來取得CloudBlobContainer這個物件,並且設定CloudBlobContainer裡面的Name屬性為mycontainer,後續我們才會於資料庫建立Container。
//取得Container
private CloudBlobContainer GetContainer()
{
    //取得Developer用的Storage Account。
    CloudStorageAccount account = CloudStorageAccount.DevelopmentStorageAccount;
    //取得Storage的Client
    CloudBlobClient client = account.CreateCloudBlobClient();
    //取得Container關聯。
    return client.GetContainerReference("mycontainer");
}
有了取得Container這個方法,接下來,我們就來實際撰寫建立容器的方法,第一行滿簡單的,就是取回CloudBlobContainer這個容器,而第二行,我們就利用取得回來的CloudBlobContainer物件來建立一個Container,CreateIfNotExist(),這個方法很好玩,如果目前資料庫裡面已經有了名為mycontainer的這個容器,他就不會再建立了,如果沒有,就會在資料庫裏面建立一個。
//建立容器
private void CreateContainerExists()
{
    CloudBlobContainer container = this.GetContainer();
    //假如沒有這個Container,就建立一個。
    container.CreateIfNotExist();
}
我們可以看到,如果程式執行到這邊,就會建立了一個mycontainer這個container。
( 這是一個很好用的Azure Storage 瀏覽工具 )
完成了存取後,我們來處理一下刷新Image這個方法,這個方法的用處是,當有上傳,或是刪除動作的時候,可以呼叫這個方法來重新刷新頁面上的控制項,詳細可以看程式碼的註解。
//刷新Image
private void RefreshImage()
{
    //ListBlobs可以取回此Container所有的Blobs,而後面可以傳入BlobRequestOptions這個物件,
    //這個物件可以設定,傳回來的條件。
    //這邊條件設定的第一個是列出所有的Blob(UseFlatBlobListing = true)
    //並且抓取所有的Blob對象 ( BlobListingDetails = BlobListingDetails.All )
    imageView.DataSource = this.GetContainer().ListBlobs(new BlobRequestOptions() { UseFlatBlobListing = true, BlobListingDetails = BlobListingDetails.All });
    imageView.DataBind();
    //每次刷新時,也清除DropDownList內的資訊。
    imageList.Items.Clear();
    var blobList = this.GetContainer().ListBlobs();
    foreach (var item in blobList)
    {
        //每個Blob都有一個Uri屬性,這裡是取得Blob的檔案名稱。
        imageList.Items.Add(item.Uri.Segments[3].ToString());
    }

    //dropDownListItem其實是紀錄目前dropDownList選了哪一個item。
    //這個變數是此類別的屬性,最後整體程式碼的時候會看到。
    imageList.SelectedIndex = dropDownListItem;

}
接下來,我們來撰寫存Image這個方法,這個方法會帶四個參數進來,第一個會傳入id,後續我們會利用Guid.NewGuid.ToString()來產生id,而第二個會傳入檔案名稱,第三個會傳入檔案的型態( image/jpeg ),第四個則是圖片binary的資料;程式碼的第一行,會使用GetBlobReference來取得Blob物件,這個方法和之前的GetContainerReference一樣,並不會馬上寫到資料庫,指示先將Blob物件準備好,後面的部分,就只是很簡單的設定檔案型態、定義MetaData,最後使用UploadByteArrary將資料寫到資料庫。
//存Image
private void SaveImage(string id, string fileName, string contentType, byte[] data)
{
    //利用GetBlobReference來取得Blob,第一個參數會帶進檔案名稱,
    //而此檔案名稱會化成Uri的一部分。
    CloudBlob blob = this.GetContainer().GetBlobReference(fileName);
    //檔案型態
    blob.Properties.ContentType = contentType;

    //定義MetaData
    NameValueCollection metadata = new NameValueCollection();
    metadata["Id"] = id;
    metadata["Filename"] = fileName;

    blob.Metadata.Add(metadata);
    blob.UploadByteArray(data);
}
最後我們要處理的就是刪除,刪除的原理很簡單,利用DropDownList所選取到的檔名去和娶回來的BlobList來比對,如果相同,就將此Blob移除。
//刪除
protected void delBtn_Click(object sender, EventArgs e)
{
    if (this.GetContainer() == null) return;

    var blobList = this.GetContainer().ListBlobs();
    foreach (var item in blobList)
    {
        string deleteImage = item.Uri.Segments[3].ToString();
        //判斷DropDownList所選擇的item名稱和Blob名稱是否相同,
        //相同就刪除。
        if (deleteImage == imageList.SelectedValue)
        {
            //利用GetBlobReference來取得Blob
            CloudBlob blob = this.GetContainer().GetBlobReference(item.Uri.ToString());
            blob.DeleteIfExists();

            //刪除完後刷新一下。
            RefreshImage();
            return;
        }
    }
}
最後附上完整的程式碼。
using System;
using System.Collections.Generic;
using System.Linq;
using System.Web;
using System.Web.UI;
using System.Web.UI.WebControls;

using System.Net;
using System.Collections.Specialized;
using System.Configuration;

using Microsoft.WindowsAzure;
using Microsoft.WindowsAzure.StorageClient;
using Microsoft.WindowsAzure.ServiceRuntime;

namespace WebRole1
{
    public partial class BlobTest : System.Web.UI.Page
    {
        int dropDownListItem = 0;
        protected void Page_Load(object sender, EventArgs e)
        {
            if (!IsPostBack)
            {
                //First
                this.CreateContainerExists();
                dropDownListItem = imageList.SelectedIndex;
                this.RefreshImage();
            }
            else
            {
                dropDownListItem = imageList.SelectedIndex;
                this.RefreshImage();
            }
        }

        //上傳
        protected void uploadBtn_Click(object sender, EventArgs e)
        {
            if (uploadImage.HasFile)
            {
                //SaveImage(string id, string fileName, string contentType, byte[] data)
                this.SaveImage(Guid.NewGuid().ToString(), uploadImage.FileName, uploadImage.PostedFile.ContentType, uploadImage.FileBytes);
                RefreshImage();
            }
        }

        //取得Container
        private CloudBlobContainer GetContainer()
        {
            //取得Developer用的Storage Account。
            CloudStorageAccount account = CloudStorageAccount.DevelopmentStorageAccount;
            //取得各種Storage的Client
            CloudBlobClient client = account.CreateCloudBlobClient();
            //取得Container。
            return client.GetContainerReference("mycontainer");
        }

        //確保容器存在
        private void CreateContainerExists()
        {
            CloudBlobContainer container = this.GetContainer();
            //假如沒有這個Container,就建立一個。
            container.CreateIfNotExist();
        }

        //刷新Image
        private void RefreshImage()
        {
            //ListBlobs可以取回此Container所有的Blobs,而後面可以傳入BlobRequestOptions這個物件,
            //這個物件可以設定,傳回來的條件。
            //這邊條件設定的第一個是列出所有的Blob(UseFlatBlobListing = true)
            //並且抓取所有的Blob對象 ( BlobListingDetails = BlobListingDetails.All )
            imageView.DataSource = this.GetContainer().ListBlobs(new BlobRequestOptions() { UseFlatBlobListing = true, BlobListingDetails = BlobListingDetails.All });
            imageView.DataBind();
            //每次刷新時,也清除DropDownList內的資訊。
            imageList.Items.Clear();
            var blobList = this.GetContainer().ListBlobs();
            foreach (var item in blobList)
            {
                //每個Blob都有一個Uri屬性,這裡是取得Blob的檔案名稱。
                imageList.Items.Add(item.Uri.Segments[3].ToString());
            }

            //dropDownListItem其實是紀錄目前dropDownList選了哪一個item。
            //這個變數是此類別的屬性,最後整體程式碼的時候會看到。
            imageList.SelectedIndex = dropDownListItem;

        }

        //存取Image
        private void SaveImage(string id, string fileName, string contentType, byte[] data)
        {
            //利用GetBlobReference來取得Blob,第一個參數會帶進檔案名稱,
            //而此檔案名稱會化成Uri的一部分。
            CloudBlob blob = this.GetContainer().GetBlobReference(fileName);
            //檔案型態
            blob.Properties.ContentType = contentType;

            //定義MetaData
            NameValueCollection metadata = new NameValueCollection();
            metadata["Id"] = id;
            metadata["Filename"] = fileName;

            blob.Metadata.Add(metadata);
            blob.UploadByteArray(data);
        }

        //刪除
        protected void delBtn_Click(object sender, EventArgs e)
        {
            if (this.GetContainer() == null) return;

            var blobList = this.GetContainer().ListBlobs();
            foreach (var item in blobList)
            {
                string deleteImage = item.Uri.Segments[3].ToString();
                //判斷DropDownList所選擇的item名稱和Blob名稱是否相同,
                //相同就刪除。
                if (deleteImage == imageList.SelectedValue)
                {
                    //利用GetBlobReference來取得Blob
                    CloudBlob blob = this.GetContainer().GetBlobReference(item.Uri.ToString());
                    blob.DeleteIfExists();

                    //刪除完後刷新一下。
                    RefreshImage();
                    return;
                }
            }
        }
    }
}
其實,這就是Blob的範例應用,雖然看起來程式碼很長,但其實還滿簡單的。


